Start Earning Passively Now with Squarespace' Member Areas

Good news for all vloggers and content creators out there. You can now use Squarespace to host your exclusive content with the new feature: Video Hosting and Monetization Tools.
How Squarespace Member Area Works
In 2020, Squarespace launched Member Areas which is an exclusive page/pages only accessible through membership. And access via membership lets you monetize exclusive content like videos, online class, training materials, research & studies, etc.
With Member Areas you can now:
#1. Sell access to video content.
With Member Areas, choose to charge a one-time or recurring fee to access your video content.
#2. Host video directly on Squarespace.
Upload your exclusive content and videos on Squarespace, in addition to externally hosted videos on YouTube and Vimeo.
#3. Host/store high quality videos.
Upload up to 30 minutes of high-resolution video content for FREE.
#4. Leverage the new video player.
Play your videos on Squarespace’s new video player with slick playback, speed controls, resolution controls, and a deep integration into the Squarespace platform.
#5. Customize your video details.
Fully customize your videos’ Titles, descriptions, URLs, custom thumbnails, metadata for better SEO.
#6. Merchandise your video content.
Categorize, arrange, and style your videos easily to best represent your brand.
These new Squarespace features aims to help content creators monetize their content by allowing them to host, manage and earn passive income from exclusive or paid content. Not only do you get a beautiful website but also have a hosting platform for your videos.
Upload your videos on Squarespace and start earning passive income.
Creating your own Member Areas in Squarespace does not come included with your website plan so you’ll have to pay an additional fee to unlock this Squarespace service. You can choose from 3 plans with the option to pay annually or monthly.
Below are the 2 payment options in comparison to each other.

Select from the 3 Squarespace Member Area subscription plans: Starter, Core and Pro.

Save up to 13% on all subscription plans by choosing the annual payment option.
How to Create My Own Member Areas on Squarespace
Creating your own member areas on Squarespace is easy.
Requirement: Squarespace site (if you don’t have a Squarespace site, go ahead and make one first).
Let’s get this started.

Click “Pages” from the top menu of your Squarespace site dashboard.
Step 1.
Go to Pages
Click ‘Pages’ from the Top Menu of your Squarespace dashboard from the left side of your screen.

Step 2.
Scroll Down to Member Areas
From the panel on the left side of your screen, scroll down to Member Areas.
Then click the ‘+’ icon.
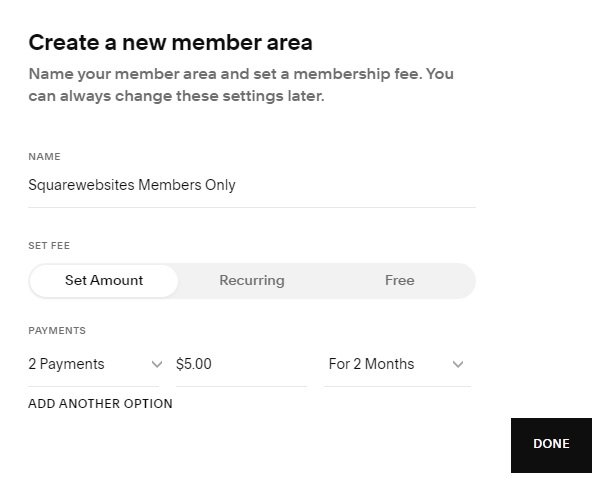
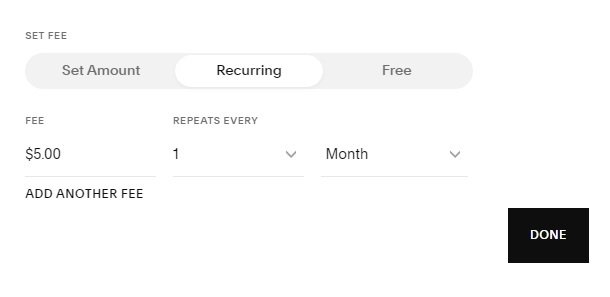
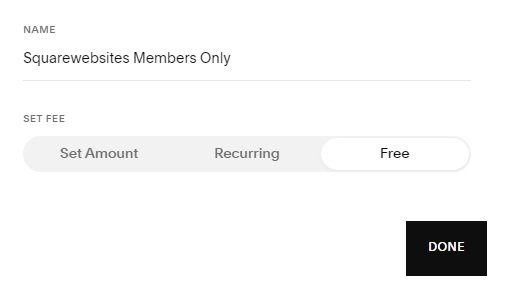
Step 3.
Set Name and Payment
Set the Name for your Member Area
Then select a Payment Option:
Option 1. Fix Payment - can be set to 1 time or number of payments
Option 2. Recurring Payment - for subscriptions
Option 3. Free - for promo or if you just want to give Free membership
Set the Fee amount
Click the Done button.

Step 4.
Add Pages to Your Member Areas
Click the ‘+’ beside the ‘Add Page’ label to start adding pages to your Member Area section.

Step 5.
Select Page Type and Page Elements
Select a page type and/or page elements you’d like to add to your Member Areas.
Simply click the icon that corresponds to the name of the page type or element you chose.
In this example, we chose Gallery to add videos to our Member Area page.
You can also use other types of pages to add video but Gallery seems to be the easiest.

Step 6.
Add Videos/Images to Your Page
Click Add Video to add a video to your Gallery.
Or click ‘Upload Image’ to upload image or images.
Click Search Images to search images online or from the ones you’ve already uploaded.

Step 7.
Add Video and Video Details
Add URL of your video source (e.g. Youtube, Vimeo, etc.)
Add Video Title
Add Video Description
Add Thumbnail Image

Step 8.
Click Save and Publish Your Video
Click “Save and Publish” to make your video live.
*If you only click Save, the video will be placed under drafts meaning people won’t be able to see it on your Member Areas’ pages.
Now that you know how to create your own and add pages to your Member Areas, start earning passively through the paid membership or expand your audience through the free membership option.
You can also further edit, customize and optimize the SEO of your Member Area through the options provided. You’ll have to pay to unlock some advanced functions/options though.
Nevertheless, have fun creating your own Member Areas and keep being creative!
Squarespace Tools for You
Copy Squarespace pages one by one or just copy the whole website instantly for just $5 using the Chrome Extension Tool.
#ChromeExtensionTool
Having a lot of content is great but displaying it all in 1 page is a lot of mess.
Make your content display easier, cleaner and more attractive to your website visitors through sort and filter using the Universal Filter plugin. Also, check out these great and creative ideas from Phil on how to organize your content with the Universal Filter.
#UniversalFilter
Need help designing your Squarespace site? Check out our Squarespace plugins store, there’s all sorts of solutions there for you.
#Squarespaceplugins